The Secret to Soft, Gooey Classic Cinnamon Buns Recipe
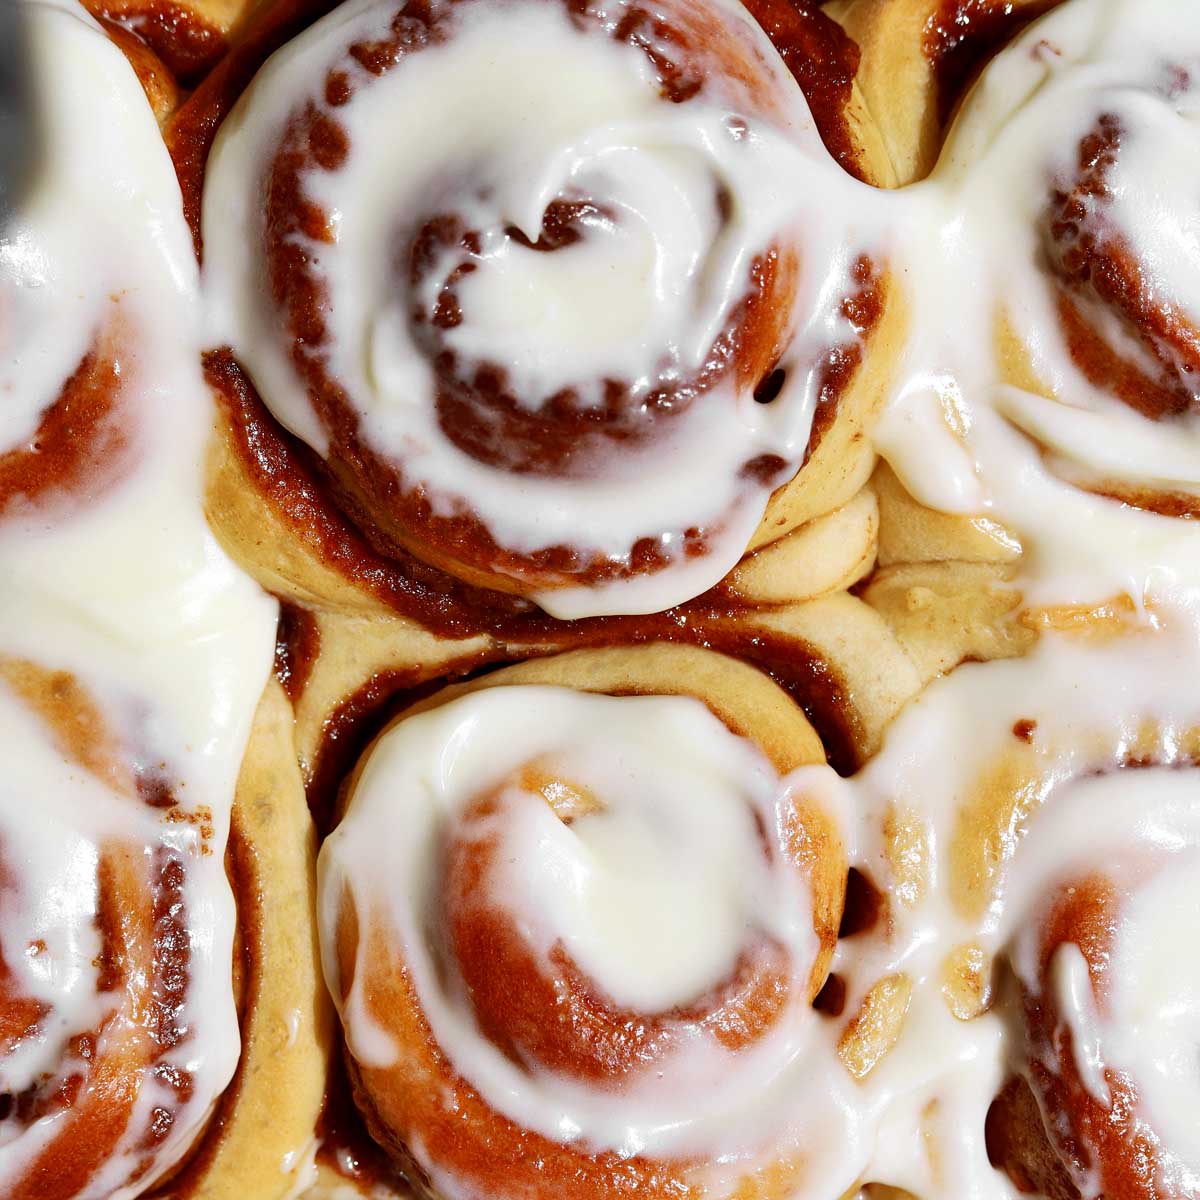
Few aromas evoke such comforting nostalgia as that of freshly baked homemade classic cinnamon rolls. The scent alone promises a delightful experience, and when you finally sink your teeth into a warm, tender swirl, it delivers on every expectation. We’re talking about those truly classic cinnamon buns – the kind that are pillowy soft, generously swirled with fragrant brown sugar and cinnamon, and crowned with a luscious, melting icing that drips into every crevice. These aren't just breakfast pastries; they're an experience, a token of homemade generosity perfect for sharing on special mornings or simply indulging in a quiet weekend.
For many, the idea of baking cinnamon buns from scratch might seem daunting. Visions of tough dough or dry rolls can deter even the most enthusiastic home baker. But what if we told you that the secret to achieving those coveted soft, gooey classic cinnamon buns isn’t magic, but rather a combination of simple techniques and a foolproof recipe? This article will unlock the mysteries behind truly tender, irresistible cinnamon rolls, guiding you through each crucial step to ensure your efforts yield nothing short of perfection.
Unlocking the Gooey Goodness: The Pillars of a Perfect Cinnamon Bun
The allure of a perfect cinnamon bun lies in its texture: a delicate balance of softness, fluffiness, and that signature gooey center. Achieving this doesn't happen by accident; it's a careful orchestration of ingredients and technique. Let's break down the key elements that contribute to that irresistible texture:
- The Dough: The foundation of any great bun is a rich, elastic, and well-hydrated dough. Using whole milk, eggs, and butter adds richness and softness, while proper kneading develops the gluten necessary for that characteristic chew and rise. Overworking or underworking the dough can lead to a dense or crumbly texture, so attention to detail here is paramount.
- The Filling: Beyond just cinnamon and sugar, the butter in the filling plays a critical role. When baked, this butter melts and caramelizes with the brown sugar, creating that sticky, gooey layer that defines a truly exceptional cinnamon bun. The ratio of butter to sugar and spice is crucial for both flavor and texture.
- The Rise: Allowing the dough ample time to rise, both after kneading and again after shaping, is non-negotiable for achieving a light, airy crumb. A warm, draft-free environment encourages the yeast to work its magic, doubling the dough's volume and developing its delicate flavor.
- The Bake: Baking at the right temperature for the correct duration ensures the buns cook through without drying out. A slightly underbaked center is often the key to maintaining ultimate gooeyness once the buns cool slightly. Overbaking is the enemy of a soft cinnamon bun.
- The Icing: While optional, a smooth, melt-in-your-mouth icing transforms a great bun into an extraordinary one. Applied while the buns are still warm, the icing gently melts into the spirals, adding moisture and a final touch of sweetness. For a truly decadent experience, consider a melted cream cheese icing.
Crafting the Fluffy Foundation: Your Dough Journey
The journey to divine classic cinnamon buns begins with the dough. It might seem like a simple blend of flour, yeast, milk, and butter, but each ingredient plays a vital role. Start by activating your yeast: gently warm half a cup of water and half a cup of milk to between 100-110°F (38-43°C). This temperature range is crucial – too cold, and the yeast won't activate; too hot, and you'll kill it. Sprinkle your active dry yeast and a pinch of sugar over the warm liquid, then let it sit undisturbed for about 5 minutes. You'll know it's ready when a foamy layer appears on the surface, indicating the yeast is alive and ready to leaven your dough.
In a separate bowl, whisk together melted butter, an egg yolk, and a touch of vanilla extract. These ingredients contribute to the richness, tenderness, and golden hue of your buns. Combine the yeast mixture with these wet ingredients, then gradually add your flour and a pinch of salt. Kneading is where the magic happens; whether by hand or with a stand mixer, aim for a dough that is smooth, elastic, and springs back when lightly pressed. This typically takes 5-7 minutes in a mixer or 10-15 minutes by hand. Proper kneading develops the gluten, creating the structure that traps air and results in that wonderfully fluffy texture. Once kneaded, place the dough in a greased bowl, cover loosely with plastic wrap, and let it rise in a warm place until doubled in size, usually about 1 to 1.5 hours. This first rise is critical for flavor development and achieving that characteristic airy crumb.
The Perfect Swirl: Filling, Rolling, and Cutting Techniques
With your dough perfectly risen, it's time to create the iconic swirl. Lightly flour a clean surface and roll out your dough into a generous rectangle, approximately 10 by 18 inches. The key here is an even thickness to ensure uniform baking. Now for the luscious filling: generously spread softened butter evenly over the dough, making sure to leave a 1-inch border along one of the longer sides. This border is essential for sealing the roll later.
Next, sprinkle your irresistible cinnamon-sugar mixture over the buttered dough, right up to the clean border. Don't be shy; this is where much of the gooey flavor comes from! For an extra gooey interior, some bakers even sprinkle a touch of brown sugar directly onto the butter before the cinnamon sugar blend. Lightly brush the clean border with water; this acts as a natural glue, helping to seal your roll tightly. Starting from the long side opposite the clean border, tightly roll the dough into an 18-inch log. The tighter you roll, the more spirals your classic cinnamon buns will have, and the less likely they are to unravel during baking. Pinch the seam firmly to seal.
Now, for cutting the individual rolls. While a sharp knife works, the secret to perfectly round, un-squished buns is a piece of unflavored dental floss or a taut piece of thread. Slip the floss underneath the log, about 1.5 inches from the end. Cross the ends of the floss over the top of the roll and pull tightly to slice cleanly through the dough. Repeat this process, cutting every 1.5 inches, until you have 12 beautiful rolls. Arrange these spirals in a buttered 9x13-inch baking dish, leaving a little space between each as they will expand significantly. Cover them loosely with plastic wrap and let them undergo their second rise in a warm spot until doubled in size, which typically takes another hour or so. This final rise ensures the buns are light and airy, preventing a dense final product.
Baking to Golden Perfection and the Icing Finish
As your rolls approach their full, puffy glory, preheat your oven to 350°F (175°C). Once ready, uncover the risen rolls and place them in the preheated oven. Bake for 25 to 30 minutes, or until they are golden brown on top and spring back gently when pressed. Be careful not to overbake, as this is the quickest way to lose that desired softness and gooeyness. If the tops are browning too quickly, you can loosely tent the dish with foil.
Once baked, remove the pan from the oven and let the classic cinnamon buns cool for about 10 minutes in the dish. This brief cooling period allows the internal sugars to set slightly and the buns to become easier to handle. While they're cooling, prepare your icing. A simple vanilla glaze is delightful: whisk together confectioners' sugar, melted butter, milk, vanilla extract, and a pinch of salt until smooth. For a richer, more tangy experience, a cream cheese icing is unparalleled. For tips on achieving the perfect balance of sweetness and tang in your cream cheese frosting, check out our guide on Achieve Soft, Fluffy Cinnamon Buns with Melted Cream Cheese Icing.
Generously drizzle or spread your chosen icing over the warm rolls. The heat from the buns will slightly melt the icing, allowing it to seep into every decadent swirl, creating an irresistible glossy finish and an extra layer of moisture and sweetness. Serve immediately for the ultimate experience, perhaps with a cup of hot coffee or tea. The wafting aroma and the first bite of a warm, gooey cinnamon bun truly make any morning special.
Tips for Success and Make-Ahead Options
To ensure your classic cinnamon buns are always a triumph, consider these additional tips:
- Room Temperature Ingredients: Ensure your milk, eggs, and butter are at room temperature when making the dough. This helps them incorporate more smoothly and encourages a better rise.
- Don't Rush the Rise: Patience is key. If your kitchen is cool, place the dough in a slightly warm oven (turned off, with just the light on) to help it rise more efficiently.
- Use Good Quality Cinnamon: A superior quality cinnamon will make a noticeable difference in the flavor of your buns.
- Freeze for Later: You can freeze baked and cooled rolls for up to two weeks. Thaw them at room temperature, then warm gently in the oven before glazing and serving. For an even fresher taste, you can prepare the rolls up to the second rise, then cover tightly and refrigerate overnight. In the morning, let them come to room temperature and finish their rise before baking as usual. This is a fantastic option for a stress-free holiday breakfast!
- Adjust Sweetness: Feel free to adjust the amount of sugar in both the filling and the icing to suit your personal preference.
Conclusion
There's an undeniable magic in creating something truly special from scratch, and classic cinnamon buns are a perfect example. From the satisfying process of kneading the dough to the intoxicating aroma that fills your home, every step is a testament to the simple joys of baking. By understanding the critical role of each ingredient and mastering a few key techniques – from yeast activation to the perfect swirl and bake – you can consistently achieve those soft, fluffy, and irresistibly gooey cinnamon buns that rival any bakery. So, roll up your sleeves, gather your ingredients, and prepare to delight your senses with this timeless, comforting treat that never fails to bring smiles to every face.
