The aroma of warm cinnamon and sweet dough wafting through your home is an experience unlike any other. It’s the scent of comfort, nostalgia, and pure indulgence. Few treats evoke such widespread joy and immediate coziness as homemade
classic cinnamon buns. These aren't just pastries; they're an invitation to slow down, savor, and share. Perfectly suited for a leisurely holiday brunch, a special cottage breakfast, or simply a quiet weekend morning indulgence, these soft, pillowy spirals promise a homemade touch that feels incredibly generous.
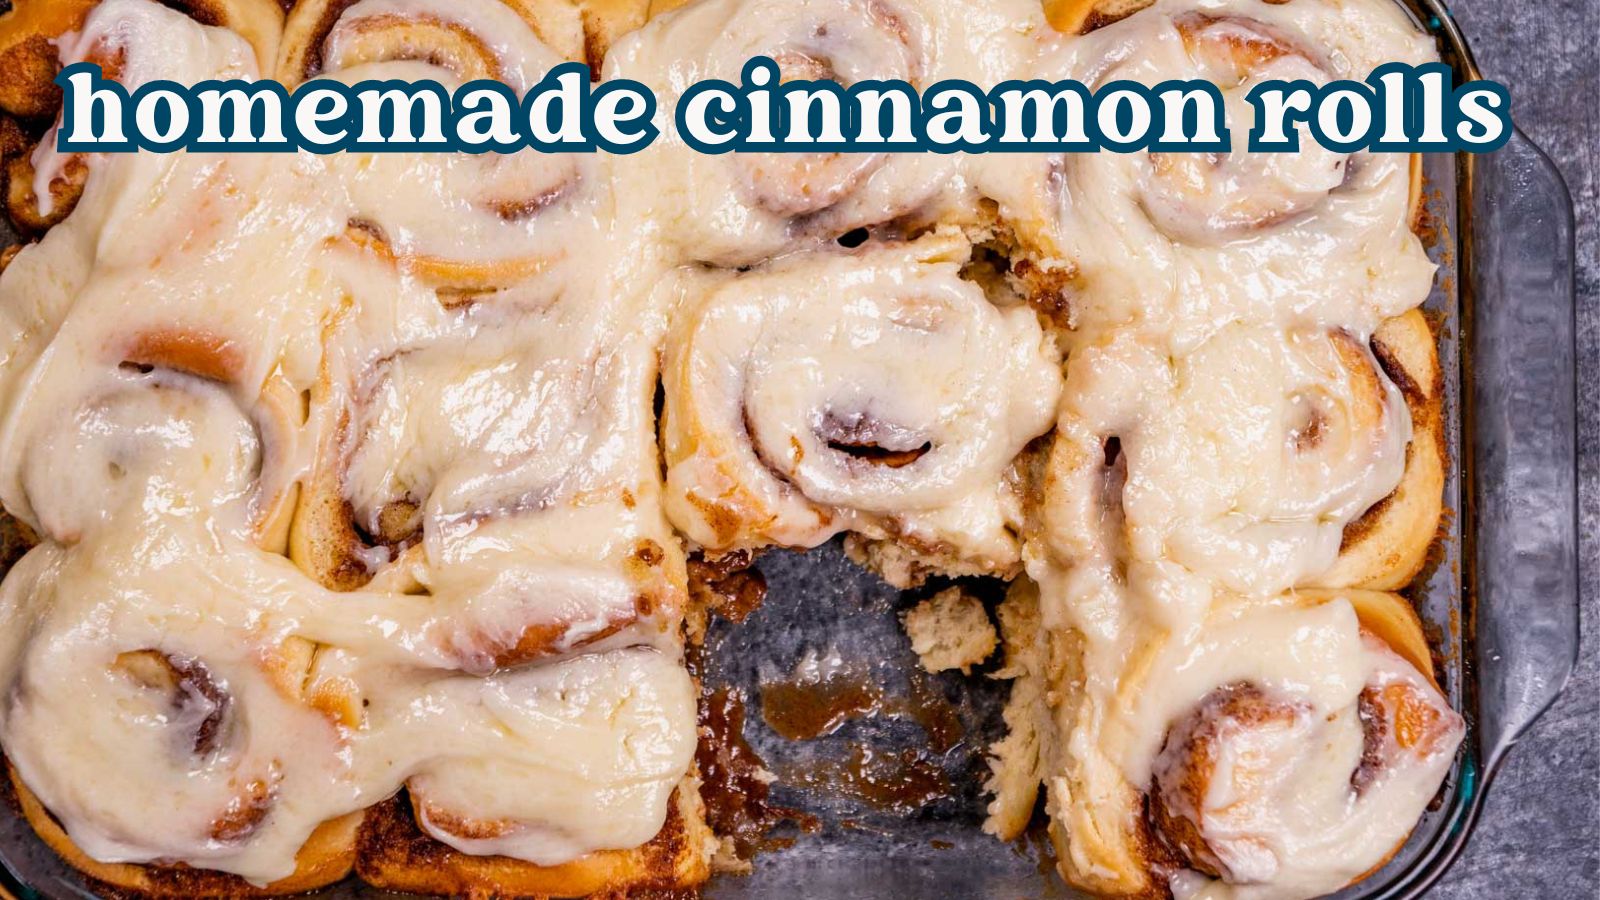
The Irresistible Charm of Classic Cinnamon Buns
There’s a reason why
classic cinnamon buns have remained a beloved staple across generations and cultures. They possess an undeniable, timeless charm that instantly transports you to a happier place. Imagine a perfectly baked bun, still warm from the oven, its delicate dough yielding to the touch. Each spiral is generously swirled with a rich mixture of brown sugar and aromatic cinnamon, creating that iconic ooey-gooey center everyone craves. Then, as if they couldn’t get any better, a luscious, creamy icing melts over every curve, seeping into the warm nooks and crannies. This combination of textures and flavors – the tender crumb, the sweet spice, the smooth glaze – is what makes them truly unforgettable.
Beyond their exquisite taste, these buns carry an emotional weight. They symbolize warmth, togetherness, and the simple pleasures of life. Making them from scratch is not just about baking; it's an act of love, a dedication to creating something truly special that brings people straight to the kitchen. And the best part? Achieving that tender, gooey perfection isn't some closely guarded secret. It boils down to a few simple steps and a reliable recipe, making these an accessible showstopper for any home baker.
Mastering the Art of Homemade Classic Cinnamon Buns: A Step-by-Step Guide
Embarking on the journey to create your own batch of
classic cinnamon buns from scratch is a rewarding experience. While it might seem daunting, breaking it down into manageable steps makes the process enjoyable and the results incredibly satisfying.
Crafting the Perfect Dough: The Foundation of Fluffiness
The secret to truly tender and fluffy cinnamon buns begins with the dough. It requires careful attention to ingredients and patience during the rising process. Start by warming milk to the ideal temperature – between 100°F and 110°F. This warmth is crucial for activating your yeast. Sprinkle the yeast and a pinch of sugar over the warm milk, then let it sit undisturbed for about 5 minutes. You'll know it's ready when it becomes foamy, indicating the yeast is active and eager to work its magic.
Next, you'll incorporate rich ingredients like melted butter, an egg yolk, and vanilla extract into your yeast mixture, adding depth of flavor and contributing to the dough’s tenderness. Gradually add flour and salt, mixing until a soft, pliable dough forms. Kneading, whether by hand or with a stand mixer, develops the gluten, giving the buns their characteristic chewiness and structure. Once kneaded, the dough needs to rise in a warm place until doubled in size, a process that typically takes about an hour to an hour and a half. This initial rise is fundamental for achieving that coveted airy texture. For more insights on perfecting your dough, read about
The Secret to Soft, Gooey Classic Cinnamon Buns Recipe.
The Signature Swirl: Filling and Shaping Your Buns
Once your dough has completed its first rise, it’s time for the magical transformation into those familiar spirals. Gently punch down the risen dough and turn it out onto a lightly floured surface. Roll the dough into a generous rectangle, approximately 10 by 18 inches. The key here is consistency; a uniform thickness ensures even baking.
Now comes the irresistible filling. Spread softened butter evenly over the entire surface of the dough, leaving a 1-inch border along one of the longer sides. This border is essential for a clean seal. Liberally sprinkle your cinnamon-sugar mixture over the buttered dough. Don't be shy – this is where much of the classic flavor comes from! To ensure your roll holds together beautifully, lightly brush the clean border with water. Then, carefully and tightly roll the dough from the opposite long side towards the water-brushed border. The tighter the roll, the more spirals you'll achieve, leading to that impressive visual appeal and ooey-gooey layers. Pinch the seam firmly to seal the log.
Cutting the rolls requires a gentle touch to maintain their shape. Instead of a knife, a long piece of unflavored dental floss or thread is often recommended. Simply slip it under the log, position it about 1 ½ inches from the end, cross the ends over the top, and pull tightly to cut a clean, uncrushed slice. Repeat this process to yield about 12 perfectly sized buns. Arrange these rolls in a buttered 9-by-13-inch baking dish, leaving a little space between each as they will expand during their second rise. Cover them loosely with plastic wrap and let them rise again in a warm spot until visibly doubled in size, usually around 1 hour and 10 minutes.
Baking to Golden Perfection and the Essential Icing
With your buns beautifully risen, it’s time for the oven. Preheat your oven to 350°F (175°C). Uncover the rolls and bake for 25 to 30 minutes, or until they are golden brown and spring back gently when lightly pressed. The scent filling your kitchen at this stage is truly heavenly! Allow the rolls to cool in the pan for about 10 minutes before applying the glaze. This brief cooling period is crucial; it allows the buns to set slightly while still being warm enough for the icing to melt and seep into those delightful spirals.
While the buns are cooling, prepare your decadent vanilla glaze. In a bowl, whisk together confectioners' sugar, melted butter, a splash of milk, a generous dash of vanilla extract, and a pinch of salt until wonderfully smooth and creamy. This glaze is simple yet utterly transformative, adding that final touch of sweetness and moisture. Drizzle it generously over the warm
classic cinnamon buns. As it melts, it creates a glistening, irresistible topping that completes the experience.
Tips for Elevating Your Classic Cinnamon Buns Experience
While the basic recipe yields incredible results, a few extra tips can take your homemade
classic cinnamon buns from great to absolutely extraordinary.
Choosing the Right Ingredients
Quality matters. Opt for fresh, active yeast, good quality unsalted butter, and pure vanilla extract for the best flavor profile. Don’t skimp on the cinnamon; a vibrant, aromatic ground cinnamon will make a noticeable difference in the filling. While the vanilla glaze is classic, don't hesitate to experiment with the luxuriousness of cream cheese icing for an even richer experience. For a truly superior topping, discover how to
Achieve Soft, Fluffy Cinnamon Buns with Melted Cream Cheese Icing.
Overnight Prep for Fresh Morning Buns
If you dream of fresh-baked cinnamon buns first thing in the morning without the early wake-up call, consider an overnight method. After shaping the rolls and placing them in the baking dish for their second rise, cover them tightly with plastic wrap and refrigerate overnight. In the morning, take them out of the fridge and let them come to room temperature and complete their final rise in a warm spot (this might take 1-2 hours) before baking as directed. This simple trick lets you enjoy warm, homemade buns with minimal morning effort.
Freezing and Reheating Hacks
Have leftover buns (if that's even possible!) or want to bake ahead? You can freeze baked
classic cinnamon buns for up to 2 weeks. Ensure they are completely cooled before freezing them in an airtight container or freezer bag. To enjoy, thaw them at room temperature, then warm them gently in the oven or microwave before glazing and serving. They’ll taste almost as good as fresh out of the oven!
Customization Ideas
Feel free to personalize your classic cinnamon buns. A sprinkle of chopped pecans or walnuts in the filling adds a delightful crunch. A touch of orange or lemon zest in the dough or icing can brighten the flavors. For a slightly different spice profile, a pinch of cardamom with your cinnamon sugar can be an exquisite addition.
Conclusion
There’s a profound satisfaction that comes with creating something so comforting and delicious from scratch. Homemade
classic cinnamon buns are more than just a sweet treat; they're a labor of love that fills your home with an intoxicating aroma and brings smiles to every face around the table. From the soft, fluffy dough to the gooey, cinnamon-spiced spirals and the smooth, melted icing, every bite is a celebration of simple pleasures. Whether for a grand holiday gathering or a quiet moment of indulgence, these timeless morning buns are always the perfect choice. So, roll up your sleeves, embrace the warmth of your kitchen, and embark on the delightful journey of baking the best classic cinnamon buns your family and friends will ever taste.